HOWTO Maximise Download Speed via Outbound Traffic Shaping
The objective of this HOWTO is to explain the principle of and reasoning behind shaping outbound traffic (specifically TCP/IP) where by sending outbound non-payload TCP/IP acknowledgement (ACK) traffic to peers as quickly as possible with minimal delay intrinsically forces them to push inbound payload TCP/IP ACK traffic back to you at a faster rate resulting in download speeds exceeding the normal expectations for typical asymmetric broadband internet connections.
In a nutshell, what does this HOWTO document?
If you are adept in Linux, you will know that all Linux processes are assigned a nice value (a scheduling priority) by the Kernel so it can schedule fairly the CPU time of running processes, effectively deciding which processes get the most CPU time over others. It is possible to renice these processes to have different priorities so as not to detriment the responsiveness of other more user interactive processes. Analogous to this, this HOWTO explains how to renice your network traffic by using some common sense principles and observations about how IP protocols work (specifically TCP/IP) and demonstrates the huge benefits this brings in terms of improving the fluidity of your internet connection!!
Who will find this HOWTO useful?
Below is a bullet point list detailing common factors and scenarios which are relevant to this HOWTO. You should read, understand and implement the ideas presented in this HOWTO if any of the following hold true for you or your internet connection and you are looking for an elegant, simple solution to streamline your connection and improve your overall online experience.
- You are adept in Linux and low level network configuration. If not, you are prepared to invest more of your time researching and reading up on further literature that is relevant to the ideas and concepts described here-in.
- Your internet connection is sluggish, laggy and experiencing symptoms of high packet latency and loss due to it being heavily congested.
- You have an asymmetric internet connection with limited upstream capacity where the download speed far exceeds the upload speed.
- You are experiencing consistently slow BitTorrent downloads that rarely saturate your available downstream bandwidth.
- You are looking for a cheap, inexpensive fix to streamline your internet connection so it is running in an optimal way that meets your needs and requirements based on how you and others use it.
- You share your internet connection with several others and typically have a couple of users who consistently abuse the connection (by continuously torrenting or leaving their online game of WOW active 24/7) thus flooding the connection and rendering it unusable, preventing you and others from performing and completing any online tasks in a respectable time frame.
Overview
There is an inherent issue with domestic broadband and that is simply the fact it is asymmetric. Commonly, such internet connections have an obscenely fast download speed with very little upload. Though, this is all good because, as a domestic (non-business) internet user, you are not supposed to be sending large quantities of outbound data to other users on the internet.
This poses a problem, however, especially when TCP/IP is concerned and I found this out recently having been upgraded by BT from a 576000/288000 bps (down/up) ADSL service to a MAX ADSL service giving me a data throughput speed of 1152000/448000 bps (down/up). I initially noticed the problem when downloading a 4 GB torrent. My upstream was saturated, and the download was not running any faster than my original 576000 bps broadband service would have done. It was at this point I decided to investigate how introducing traffic shaping on to my connection could improve performance.
This short HOWTO explains my findings and documents, in simplistic terms, what is required to gain maximum downstream throughput on your asymmetric broadband connection. It details why the performance of TCP/IP is horrific unless outbound traffic shaping is employed and includes an example BASH script for Linux that defines some very simple but powerful routing policies to shape and prioritise outbound TCP/IP packets.
Theory
Why NOT shape inbound traffic?
For this entire performance boost to work, the secret, believe it or not, is NOT to shape inbound traffic. You can do this if you want and there may be instances where this will be beneficial. For example, if you have 20 PCs (in a small net café) sharing a single broadband connection, you may want to control how much bandwidth any single machine can use downstream. Or you may just want to control how much bandwidth a specific protocol can use downstream. But if you are on a home network with only a few PCs with active users, you can safely ignore shaping downstream traffic.
The reason for ignoring downstream traffic is simple; you have absolutely no control over it and so it is best left as is. Anyone on the internet can send you anything they wish and the packets will be routed down your broadband connection and through to your modem and network. There is nothing you can do to stop or change the rate at which this happens, except maybe obtaining your broadband service from an ISP which employs traffic shaping their side. These downstream packets will utilise valuable bandwidth to reach you so we now use this fact to our advantage by considering how controlling the traffic sent outbound (which you do have control over) directly affects the traffic coming inbound.
Why shape outbound traffic?
Instead, we shape outbound traffic only, specifically TCP/IP, and this is the core reason for doing so. We observe that TCP has a number of categories of packet; packets that create connections (SYN), destroy connections (FIN) and acknowledgement packets (ACK) which determine the flow of traffic over an established TCP connection. The category of most interest to us in this HOWTO is the infamous ACK packet which also comes in two flavours; payload and non-payload ACKs. Payload ACKs are sent when transmitting useful data to your peers whilst non-payload ACKs are sent to acknowledge you received their data. So, as a peer yourself, you are interested in letting your remote peers know, as quickly as possible, that you received their data. Doing so will mean they send their next payload ACKs to you quicker, with minimal delay.
It is for this reason that if outbound traffic shaping is applied, you will not only see improved performance across all aspects of your asymmetric broadband connection but also allow the potential for complete saturation of your downstream bandwidth (especially during BitTorrent downloads) and thus intrinsically maximise your download speed!
Example Linux BASH Scripts employing Queue Disciplines (QDISCs)
Below are example Linux BASH scripts which instruct the Linux Kernel to be especially clever when routing outbound traffic, specifically TCP/IP. They achieve this by utilising eight Linux Kernel Queue Disciplines (QDISCs) and placing traffic into an appropriate queue based on the priority it requires by filtering on packet protocol, port, flags and size. The eight queues and the packets that should be placed in them, in order of importance, are as follows:
- Link-Critical Traffic
Traffic that needs to take total and absolute priority over any other traffic that may be sent out over the network interface that is being shaped. This commonly applies to ARP (Address Resolution Protocol) traffic on ethernet interfaces. If the interface acquires its IP address via DHCP (common on cable broadband connections), it is best to place DHCP traffic into this class as well. In the case of PPP interfaces, this class becomes redundant and is not used.
- Time-Critical Traffic
Traffic that needs to be routed out before any other type of traffic and should include TCP packets with SYN, SYN+ACK, ACK+FIN, ACK+RST and RST flags set (control packets) as well as all or some UDP traffic (depending on specific requirements). Also include non-payload TCP ACK packets (small ACK packets that contain no data with a size of 40 or 60 bytes, depending if IPv4 or IPv6 respectively).
- Critical Traffic
Traffic that is critical but NOT time-critical. An example of such traffic might be an IPv6 tunnel running over IPv4. Also include TCP ACK packets that are slightly larger.
- High-Priority Interactive Traffic
SSH and Telnet (TCP ports 22 and 23). Also include TCP ACK packets that are larger still.
- Low-Priority Interactive Traffic
HTTP and HTTPS (TCP ports 80 and 443). Also include TCP ACK packets that are larger again.
- High-Priority Non-Interactive Traffic
FTP and MySQL (TCP ports 20, 21 and 3306). Also include TCP ACK packets that are larger yet again.
- Low-Priority Non-Interactive Traffic
Email traffic such as SMTP and POP/IMAP (TCP ports 25, 110, 143, 220 and 993). Also include TCP ACK packets that are very large.
- Non-Critical Traffic
All ICMP traffic. Also include TCP ACK packets that basically have a full payload.
Keep in mind that if you run a server on your connection, you may also want to give priority to outbound traffic relating to the services your server runs. You can do this by duplicating the appropriate ip(6)tables MANGLE table POSTROUTING chain rules below but using --sport rather than --dport. --sport is matching against all server related traffic (by looking at the source port number) whereas --dport is matching against all client related traffic (by looking at the destination port number). For example, if you want to shape outbound HTTP client traffic (traffic relating to websites you visit), use --dport 80. If you want to shape outbound HTTP server traffic (traffic relating to your own webserver), use --sport 80. Simples! :-)
So here are the scripts. The first is a general version designed to work with CentOS 5.x running a 2.6.18 Kernel where we have a dual IP4+6 stack. In this case, the system lacks the -j CLASSIFY feature in ip6tables so the only option we have, for native IPv6 traffic, is to apply a blanket classification using a TC rule.
The second script fully supports CentOS 6.x running a 2.6.32 Kernel where ip6tables does now support -j CLASSIFY. Thus, it is possible to supply both iptables and ip6tables with the same command line arguments, and setup the same traffic classification on both IP stacks (things are slightly different for ICMP in this case, but this is easily dealt with via a simple if statement).
CentOS 5.x (2.6.18 Kernel)
#!/bin/bash
#
# Download Maximiser (Outbound Traffic Shaper for Asymmetric Broadband)
#


# BEGIN CONFIG

# set path to IPTABLES binary
IPT=/sbin/iptables

# set path to TC binary
TC=/sbin/tc

# set the broadband network interface to be shaped
IF=ppp0

# set the IPTABLES chain for this script
CHAIN=SHAPE

# define the maximum bits per second the broadband
# upstream operates at without queuing (IMPORTANT!)
MAX=350000

# END CONFIG


function shape {


  # setup a new CHAIN for shaping and protocol offset

  $IPT -t mangle -N $CHAIN
  o=40


  # route outbound traffic into appropriate CLASSes

  #
  # link-critical traffic (normally left empty unless interface acquires IP via DHCP)
  #

  CLA=1
  # --- if interface acquires IP via DHCP, uncomment the line below
  # $IPT -t mangle -I $CHAIN -p udp --sport 68 --dport 67 -j CLASSIFY --set-class 1:$CLA

  # --- if root user needs to be able to send out ping requests at highest priority, uncomment the line below
  # $IPT -t mangle -I $CHAIN -p icmp --icmp-type echo-request -m owner --uid-owner 0 -j CLASSIFY --set-class 1:$CLA


  #
  # time-critical traffic
  #

  CLA=2
  # --- place DNS lookup traffic in this class (fast browsing requires fast DNS resolving)
  $IPT -t mangle -I $CHAIN -p udp --dport 53 -j CLASSIFY --set-class 1:$CLA

  # --- Since DNSSEC is now becoming mainstream, pushing replies over the 512 byte limit,
  # --- DNS requests will start to use TCP instead of UDP, so this rule is also required.
  $IPT -t mangle -I $CHAIN -p tcp --dport 53 -j CLASSIFY --set-class 1:$CLA

  # --- also place all standard TCP control packets in this class along with 0 length ACKs
  $IPT -t mangle -I $CHAIN -p tcp --syn -j CLASSIFY --set-class 1:$CLA
  $IPT -t mangle -I $CHAIN -p tcp --tcp-flags FIN,SYN,RST,ACK RST -j CLASSIFY --set-class 1:$CLA
  $IPT -t mangle -I $CHAIN -p tcp --tcp-flags FIN,SYN,RST,ACK FIN,ACK -j CLASSIFY --set-class 1:$CLA
  $IPT -t mangle -I $CHAIN -p tcp --tcp-flags FIN,SYN,RST,ACK SYN,ACK -j CLASSIFY --set-class 1:$CLA
  $IPT -t mangle -I $CHAIN -p tcp --tcp-flags FIN,SYN,RST,ACK RST,ACK -j CLASSIFY --set-class 1:$CLA
  $IPT -t mangle -I $CHAIN -p tcp --tcp-flags FIN,SYN,RST,ACK ACK -m length --length $o -j CLASSIFY --set-class 1:$CLA


  #
  # critical traffic
  #

  CLA=3
  # --- IPv6 tunnel traffic (IP protocol 41) goes in this class
  $IPT -t mangle -I $CHAIN -p ipv6 -j CLASSIFY --set-class 1:$CLA


  #
  # high-priority interactive traffic
  #

  CLA=4
  # --- inbound and outbound SSH goes in this class
  $IPT -t mangle -I $CHAIN -p tcp --dport 22 -j CLASSIFY --set-class 1:$CLA
  $IPT -t mangle -I $CHAIN -p tcp --sport 22 -j CLASSIFY --set-class 1:$CLA


  #
  # low-priority interactive traffic
  #

  CLA=5
  # --- inbound and outbound HTTP and HTTPS goes in this class
  $IPT -t mangle -I $CHAIN -p tcp -m multiport --dport 80,443 -j CLASSIFY --set-class 1:$CLA
  $IPT -t mangle -I $CHAIN -p tcp -m multiport --sport 80,443 -j CLASSIFY --set-class 1:$CLA


  #
  # high-priority non-interactive traffic
  #

  CLA=6
  # --- inbound FTP-data, FTP and MySQL goes in this class
  $IPT -t mangle -I $CHAIN -p tcp -m multiport --dport 20,21,3306 -j CLASSIFY --set-class 1:$CLA


  #
  # low-priority non-interactive traffic
  #

  CLA=7
  # --- inbound and outbound SMTP and POP goes in this class
  $IPT -t mangle -I $CHAIN -p tcp -m multiport --dport 25,110,143,220,993 -j CLASSIFY --set-class 1:$CLA
  $IPT -t mangle -I $CHAIN -p tcp -m multiport --sport 25,110,143,220,993 -j CLASSIFY --set-class 1:$CLA


  #
  # non-critical traffic (default class)
  #

  CLA=8
  # --- catch-all rule to place all other traffic in lowest priority class
  $IPT -t mangle -I $CHAIN -j CLASSIFY --set-class 1:$CLA


  # setup QDISCs and CLASSes and route packets according to size

  $TC qdisc add dev $IF root handle 1: htb default 1
  $TC class add dev $IF parent 1: classid 1:1 htb rate ${MAX}bit

  for i in {1..8}
  do
    $TC class add dev $IF parent 1:1 classid 1:$i htb rate $[$MAX/8]bit ceil ${MAX}bit prio $[$i-1]
    $TC qdisc add dev $IF parent 1:$i handle $i: sfq perturb 10
    [ $i -gt 2 ] && $IPT -t mangle -I $CHAIN -p tcp --tcp-flags FIN,SYN,RST,ACK ACK -m length --length $[($i-2)**4+$o]:$[($i-1)**4+$o-1] -j CLASSIFY --set-class 1:$i
    [ $i -gt 2 ] && $IPT -t mangle -I $CHAIN -p udp -m length --length $[($i-2)**4+$o-13]:$[($i-1)**4+$o-14] -j CLASSIFY --set-class 1:$i
  done


  # start pushing traffic into this new chain

  $IPT -t mangle -I POSTROUTING -o $IF -j $CHAIN


  # if using native IPv6, with a non-bleeding edge distro of Linux (CentOS 5.x),
  # we need to use a TC filter to classify IPv6 traffic into a particular class
  # as ip6tables doesn't yet support -j CLASSIFY

  CLA=3
  $TC filter add dev $IF parent 1: protocol ipv6 u32 match ip dst any flowid 1:$CLA


}

function flush {

  $TC qdisc del dev $IF root

  $IPT -t mangle -D POSTROUTING -o $IF -j $CHAIN
  $IPT -t mangle -F $CHAIN
  $IPT -t mangle -X $CHAIN

}

case "$1" in
on)
        echo "Enabling Outbound Traffic Shaping on $IF"
        flush; shape
        ;;
off)
        echo "Disabling Outbound Traffic Shaping on $IF"
        flush
        ;;
show)
        $TC -s class show dev $IF; $IPT -t mangle -vL $CHAIN
        ;;
*)
        echo "Usage: $0 (on|off|show)"
        ;;
esac
CentOS 6.x (2.6.32 Kernel)
#!/bin/bash
#
# Download Maximiser (Outbound Traffic Shaper for Asymmetric Broadband)
#


# BEGIN CONFIG

# set path to IPTABLES binaries
IPT=/sbin/ip{,6}tables

# set path to TC binary
TC=/sbin/tc

# set the broadband network interface to be shaped
IF=ppp0

# set the IPTABLES chain for this script
CHAIN=SHAPE

# define the maximum bits per second the broadband
# upstream operates at without queuing (IMPORTANT!)
MAX=350000

# END CONFIG


function shape {


  # set path to IP(6)TABLES binary, a new chain for shaping and protocol offset

  local IPT=$1
  $IPT -t mangle -N $CHAIN
  [[ $IPT =~ 6 ]] && o=60 || o=40


  # route outbound traffic into appropriate CLASSes

  #
  # link-critical traffic (normally left empty unless interface acquires IP via DHCP)
  #

  CLA=1
# $IPT -t mangle -I $CHAIN -p udp --sport 68 --dport 67 -j CLASSIFY --set-class 1:$CLA
  if [[ $IPT =~ 6 ]]; then
    $IPT -t mangle -I $CHAIN -m icmp6 -p icmpv6 --icmpv6-type echo-request -m owner --uid-owner 0 -j CLASSIFY --set-class 1:$CLA
  else
    $IPT -t mangle -I $CHAIN -p icmp --icmp-type echo-request -m owner --uid-owner 0 -j CLASSIFY --set-class 1:$CLA
  fi


  #
  # time-critical traffic
  #

  CLA=2
  # --- place DNS lookup traffic in this class (fast browsing requires fast DNS resolving)
  $IPT -t mangle -I $CHAIN -p udp --dport 53 -j CLASSIFY --set-class 1:$CLA

  # --- Since DNSSEC is now becoming mainstream, pushing replies over the 512 byte limit,
  # --- DNS requests will start to use TCP instead of UDP, so this rule is also required.
  $IPT -t mangle -I $CHAIN -p tcp --dport 53 -j CLASSIFY --set-class 1:$CLA

  # --- also place all standard TCP control packets in this class along with 0 length ACKs
  $IPT -t mangle -I $CHAIN -p tcp --syn -j CLASSIFY --set-class 1:$CLA
  $IPT -t mangle -I $CHAIN -p tcp --tcp-flags FIN,SYN,RST,ACK RST -j CLASSIFY --set-class 1:$CLA
  $IPT -t mangle -I $CHAIN -p tcp --tcp-flags FIN,SYN,RST,ACK FIN,ACK -j CLASSIFY --set-class 1:$CLA
  $IPT -t mangle -I $CHAIN -p tcp --tcp-flags FIN,SYN,RST,ACK SYN,ACK -j CLASSIFY --set-class 1:$CLA
  $IPT -t mangle -I $CHAIN -p tcp --tcp-flags FIN,SYN,RST,ACK RST,ACK -j CLASSIFY --set-class 1:$CLA
  $IPT -t mangle -I $CHAIN -p tcp --tcp-flags FIN,SYN,RST,ACK ACK -m length --length $o -j CLASSIFY --set-class 1:$CLA


  #
  # critical traffic
  #

  CLA=3
  $IPT -t mangle -I $CHAIN -p ipv6 -j CLASSIFY --set-class 1:$CLA


  #
  # high-priority interactive traffic
  #

  CLA=4
  $IPT -t mangle -I $CHAIN -p tcp --dport 22 -j CLASSIFY --set-class 1:$CLA
  $IPT -t mangle -I $CHAIN -p tcp --sport 22 -j CLASSIFY --set-class 1:$CLA


  #
  # low-priority interactive traffic
  #

  CLA=5
  $IPT -t mangle -I $CHAIN -p tcp -m multiport --dport 80,443 -j CLASSIFY --set-class 1:$CLA
  $IPT -t mangle -I $CHAIN -p tcp -m multiport --sport 80,443 -j CLASSIFY --set-class 1:$CLA


  #
  # high-priority non-interactive traffic
  #

  CLA=6
  $IPT -t mangle -I $CHAIN -p tcp -m multiport --dport 20,21,3306 -j CLASSIFY --set-class 1:$CLA


  #
  # low-priority non-interactive traffic
  #

  CLA=7
  $IPT -t mangle -I $CHAIN -p tcp -m multiport --dport 25,110,143,220,993 -j CLASSIFY --set-class 1:$CLA
  $IPT -t mangle -I $CHAIN -p tcp -m multiport --sport 25,110,143,220,993 -j CLASSIFY --set-class 1:$CLA


  #
  # non-critical traffic (default class)
  #

  CLA=8
  $IPT -t mangle -I $CHAIN -j CLASSIFY --set-class 1:$CLA


  for i in {3..7}
  do
    $IPT -t mangle -I $CHAIN -p tcp --tcp-flags FIN,SYN,RST,ACK ACK -m length --length $[($i-2)**4+$o]:$[($i-1)**4+$o-1] -j CLASSIFY --set-class 1:$i
    $IPT -t mangle -I $CHAIN -p udp -m length --length $[($i-2)**4+$o-13]:$[($i-1)**4+$o-14] -j CLASSIFY --set-class 1:$i
  done


  # start pushing traffic into this new chain

  $IPT -t mangle -I POSTROUTING -o $IF -j $CHAIN


}

function flush {

  $TC qdisc del dev $IF root

  for i in $(eval echo $IPT)
  do
    $i -t mangle -D POSTROUTING -o $IF -j $CHAIN
    $i -t mangle -F $CHAIN
    $i -t mangle -X $CHAIN
  done

}

case "$1" in
on)
        echo "Enabling Outbound Traffic Shaping on $IF"

        flush

        $TC qdisc add dev $IF root handle 1: htb default 1
        $TC class add dev $IF parent 1: classid 1:1 htb rate ${MAX}bit

        for i in {1..8}
        do
          $TC class add dev $IF parent 1:1 classid 1:$i htb rate $[$MAX/8]bit ceil ${MAX}bit prio $[$i-1]
          $TC qdisc add dev $IF parent 1:$i handle $i: sfq perturb 10
        done

        for i in $(eval echo $IPT)
        do
          shape $i
        done
        ;;
off)
        echo "Disabling Outbound Traffic Shaping on $IF"
        flush
        ;;
show)
        $TC -s class show dev $IF
        for i in $(eval echo $IPT)
        do
          $i -t mangle -vL $CHAIN
        done
        ;;
*)
        echo "Usage: $0 (on|off|show)"
        ;;
esac
After running this script, it will have inserted a reference to its newly created SHAPE chain into the iptables MANGLE table POSTROUTING chain, and populated its own SHAPE chain with the following entries (run the command ip(6)tables -t mangle -L to display this):
Chain POSTROUTING (policy ACCEPT)
target     prot opt source               destination
SHAPE      all  --  anywhere             anywhere

...

Chain SHAPE (1 references)
target     prot opt source               destination
CLASSIFY   udp  --  anywhere             anywhere            length 652:1322 CLASSIFY set 1:7
CLASSIFY   tcp  --  anywhere             anywhere            tcp flags:FIN,SYN,RST,ACK/ACK length 665:1335 CLASSIFY set 1:7
CLASSIFY   udp  --  anywhere             anywhere            length 283:651 CLASSIFY set 1:6
CLASSIFY   tcp  --  anywhere             anywhere            tcp flags:FIN,SYN,RST,ACK/ACK length 296:664 CLASSIFY set 1:6
CLASSIFY   udp  --  anywhere             anywhere            length 108:282 CLASSIFY set 1:5
CLASSIFY   tcp  --  anywhere             anywhere            tcp flags:FIN,SYN,RST,ACK/ACK length 121:295 CLASSIFY set 1:5
CLASSIFY   udp  --  anywhere             anywhere            length 43:107 CLASSIFY set 1:4
CLASSIFY   tcp  --  anywhere             anywhere            tcp flags:FIN,SYN,RST,ACK/ACK length 56:120 CLASSIFY set 1:4
CLASSIFY   udp  --  anywhere             anywhere            length 28:42 CLASSIFY set 1:3
CLASSIFY   tcp  --  anywhere             anywhere            tcp flags:FIN,SYN,RST,ACK/ACK length 41:55 CLASSIFY set 1:3
CLASSIFY   all  --  anywhere             anywhere            CLASSIFY set 1:8
CLASSIFY   tcp  --  anywhere             anywhere            multiport sports smtp,pop3,imap,imap3,imaps CLASSIFY set 1:7
CLASSIFY   tcp  --  anywhere             anywhere            multiport dports smtp,pop3,imap,imap3,imaps CLASSIFY set 1:7
CLASSIFY   tcp  --  anywhere             anywhere            multiport dports ftp-data,ftp,mysql CLASSIFY set 1:6
CLASSIFY   tcp  --  anywhere             anywhere            multiport sports http,https CLASSIFY set 1:5
CLASSIFY   tcp  --  anywhere             anywhere            multiport dports http,https CLASSIFY set 1:5
CLASSIFY   tcp  --  anywhere             anywhere            tcp spt:ssh CLASSIFY set 1:4
CLASSIFY   tcp  --  anywhere             anywhere            tcp dpt:ssh CLASSIFY set 1:4
CLASSIFY   ipv6 --  anywhere             anywhere            CLASSIFY set 1:3
CLASSIFY   tcp  --  anywhere             anywhere            tcp flags:FIN,SYN,RST,ACK/ACK length 40 CLASSIFY set 1:2
CLASSIFY   tcp  --  anywhere             anywhere            tcp flags:FIN,SYN,RST,ACK/RST,ACK CLASSIFY set 1:2
CLASSIFY   tcp  --  anywhere             anywhere            tcp flags:FIN,SYN,RST,ACK/SYN,ACK CLASSIFY set 1:2
CLASSIFY   tcp  --  anywhere             anywhere            tcp flags:FIN,SYN,RST,ACK/FIN,ACK CLASSIFY set 1:2
CLASSIFY   tcp  --  anywhere             anywhere            tcp flags:FIN,SYN,RST,ACK/RST CLASSIFY set 1:2
CLASSIFY   tcp  --  anywhere             anywhere            tcp flags:FIN,SYN,RST,ACK/SYN CLASSIFY set 1:2
CLASSIFY   tcp  --  anywhere             anywhere            tcp dpt:domain CLASSIFY set 1:2
CLASSIFY   udp  --  anywhere             anywhere            udp dpt:domain CLASSIFY set 1:2
CLASSIFY   icmp --  anywhere             anywhere            icmp echo-request owner UID match root CLASSIFY set 1:1
CLASSIFY   udp  --  anywhere             anywhere            udp spt:bootpc dpt:bootps CLASSIFY set 1:1
Running ip(6)tables -t mangle -vL will display the counters for each rule above, allowing you to diagnose your shaping policies to determine if your rules are correctly channeling packets into the right classes. The command ip(6)tables -t mangle -Z [chain] will zero (reset) counters in a specific chain, or all chains if no chain is specified.
Summary
Going against popular intuition, the script populates its SHAPE chain before creating the qdisc and classes as this was the only way I could achieve the packet matching I wanted, in the order I wanted, whilst still keeping a default catch-all traffic rule for class 8. It gives total priority to all TCP packets with SYN, SYN+ACK, ACK+FIN, ACK+RST and RST flags set (control packets) as well as DNS lookup traffic (fast browsing requires fast DNS resolving). It then continues mangling other types of traffic into lower priority classes (modify this section to suit your requirements). Lastly, the final packet of importance is the infamous TCP ACK. This is dealt with via the same loop which creates our qdiscs and classes (for the CentOS 5.x script only; for the CentOS 6.x version, the creation of qdiscs and classes has been moved to where it will only ever be executed once due to independently classifying dual stack traffic later on). The loop sets up ip(6)tables MANGLE table POSTROUTING rules so that, depending on the size or length of the TCP ACK packet, we determine its fate and what class it ends up in for postrouting, as follows:
... tcp flags:FIN,SYN,RST,ACK/ACK length 665:1335 CLASSIFY set 1:7
... tcp flags:FIN,SYN,RST,ACK/ACK length 296:664 CLASSIFY set 1:6
... tcp flags:FIN,SYN,RST,ACK/ACK length 121:295 CLASSIFY set 1:5
... tcp flags:FIN,SYN,RST,ACK/ACK length 56:120 CLASSIFY set 1:4
... tcp flags:FIN,SYN,RST,ACK/ACK length 41:55 CLASSIFY set 1:3
In this same loop, we also introduce a similar setup for UDP traffic (optional):
... udp length 652:1322 CLASSIFY set 1:7
... udp length 283:651 CLASSIFY set 1:6
... udp length 108:282 CLASSIFY set 1:5
... udp length 43:107 CLASSIFY set 1:4
... udp length 28:42 CLASSIFY set 1:3
The generalisation of the above is quite effective since we can assume that the larger the size of a TCP ACK (or UDP) packet, the more likely it is to contain payload data. The more data it has, the further it sinks in priority of being sent out our broadband connection first leaving all the real control ACK packets (with little or no payload) to exit as quickly as possible. Observe the catch-all rule at the end which forces unmatched packets into the lowest priority non-critical (8) class. This is required as our default class for unclassified traffic on the root QDISC is link-critical (1). Finally, note that we do not need to consider TCP packets less than 40 bytes in size as such packets would be invalid (20 bytes minimum IP header + 20 bytes minimum TCP header). The same goes for UDP packets less than 28 bytes (20 bytes minumum IP header + 8 bytes UDP header).
Configuration
Setting an optimal value for MAX
The most important part in the above script, before you even consider customising it, is the MAX constant in the configuration section at the beginning. This needs to be set correctly and as close to your broadband connection's upload speed as possible, but never exceeding it. If this number exceeds your capable upload speed, packets will start being queued at your modem or router which completely destroys any traffic shaping Linux applied previously to your outbound traffic. I can't stress this point enough and it is imperative this value is set correctly.
It can be a difference of only 10 kbits that inhibits downstream traffic reaching 100% of your capable download potential. For example, on my 448000 bps upload rate, I found MAX=360000 destroys the speed of torrent downloads but MAX=350000 works perfectly. This is because of the ADSL overhead. In general, for ADSL connections, the actual maximum throughput is around 80% of the ADSL sync speed, so an overhead factor of anywhere between 75% and 80% should be used when locating the most optimum value for MAX on ADSL (the extra 5% is normally good for allowing packet bursts to happen when the upstream is completely saturated). For cable connections, there is no overhead, but it is probably still advisable to set MAX to anywhere between 90% and 95% of the cable modem outbound speed to avoid the risk of packet queuing at the modem.
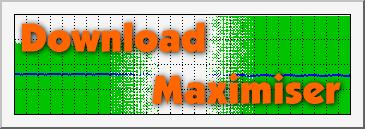
You can see how important setting a correct value for MAX is from observing the real MRTG graphic in the DM logo at the top of this page. If the outbound is saturated (thus destroying traffic shaping), the download speed is killed (left side of the graphic). If you pull the upload ceiling back slightly so it is just below your maximum upload rate, and then shape it, the downstream is maximised fully (right side of the graphic). Experimentation will be necessary to locate the optimal value of MAX and the best way of doing this is by downloading an extremely fast torrent adjusting and re-running the script with varied values of MAX until you find one which doesn't kill your download speed.
The sum of the minimum speed of each class, across all classes, must be less than or equal to MAX
This is important. In the above script, 8 classes are created each with 43750 bits of minimum outbound bandwidth allocated to them, making the total 350000 bits (or if MAX is adjusted to a different value, each class will have one eighth of MAX minimum bandwidth allocated to it). This is desirable when shaping via HTB (Hierarchical Token Bucket) since if the sum was larger than MAX, some lower priority packets may start being dropped completely which is really far from ideal. And since we are only interested in prioritising certain types of outbound packets rather than controlling the bandwidth they utilise, and the fact HTB qdiscs and classes can borrow unused bandwidth from each other as and when required, this is the simplest configuration to go with. If it is a necessity to delegate more outbound bandwidth to particular classes of traffic over others, rewrite this section of the script ensuring that the sum does not exceed the value of MAX (for example, you could have 80000, 70000, 60000, 45000, 35000, 30000, 20000 and 10000, the total of which is still 350000).
Does this script need to be tweaked so shaping will operate smoothly on an ETHERNET (eth*) network interface rather than a PPP (ppp*) network interface?
The short answer to this question is NO. If we are shaping an ethernet interface directly (that is, IF=eth0 rather than IF=ppp0 in the above script), we should be fine because our default class for all unclassified traffic (which includes ARP) is 1, due to this line:
tc qdisc add dev $IF root handle 1: htb default 1
This instructs Linux to route all traffic that has NOT been classified (ethernet ARP traffic) into the link-critical (1) class rather than the non-critical (8) class.
The reason for doing this is as follows. ARP (the Address Resolution Protocol) can be classed as link-critical traffic, which is of a higher priority than even time-critical. Link-critical traffic is traffic that sits below the IP layer, and is not normally traffic that concerns us. In terms of PPP, if you run TCPDUMP on a PPP interface, the ONLY traffic you will ever see is IP. However, if the PPP session is running over an ethernet interface, and you run TCPDUMP on that ethernet interface, you will see that the IP traffic is encapsulated inside the PPP packets which run over the ethernet interface, and you will also see link-layer PPP traffic (PING? PONG!) packets that are directly related to the PPP session. These exist in order to periodically confirm that the PPP session is responsive, active and still functioning, and that both peers are alive.
The same PING? PONG! traffic occurs on ethernet and is called ARP. If ARP traffic is placed in a low priority class, there is then the risk of this traffic being filtered and potentially dropped by the Linux traffic shaping subsystem because the shaping policies will have been applied directly onto the ethernet interface. This is bad news as link-critical traffic must never ever be dropped. Having investigated this further, there doesn't appear to be any way of making IPTABLES match ARP traffic, simply because IPTABLES is designed to help us only filter and manage IP traffic, not protocols residing on the network layer below this, such as ARP. But, the shaping policies that Linux uses will still see this ARP traffic as unclassified traffic and, as such, place ARP packets into what ever class is the default one, which in the above script, is link-critical (1) and not non-critical (8), which is precisely what we require. This is also the reason why we need a default IPTABLES catch-all rule that places all non-classified IP traffic into the lowest priority non-critical (8) class.
Out Of Order Packets
I have been contacted and even noted a forum post raising concerns that the traffic shaping methods documented in this HOWTO introduce the potential for out of ordered packets to arrive at peers. In the case of UDP, this is indeed very possible, so you need to be aware of this if using any applications or services that use UDP as a transport protocol (Skype is one such application). However, TCP can handle out of ordered packets; that's why the protocol was developed in the first place, so shaping traffic via these methods will not cause any ill effects, except for maybe dupACK (duplicate ACK) packets being sent if TCP packets arrive out of order at peers.
Out of order packets may arrive at a peer if the packets in a TCP stream have not been intentionally placed into a particular class by matching against something consistent like a client or peer port number. In the above, if packets are not classified by port numbers, they are then classified by size. Under this scenario, the only possible way out of ordered packets could then be generated would be if both the client and peer are exchanging large quantities of payload ACK packets of varying sizes within the same TCP session. If the sizes of these packets are quite varied, the rules above will prioritise them differently meaning packets within the same TCP stream will be sent out of order causing them to arrive at the peer out of order, thus forcing dupACKs to be sent by the peer (depending on the dupACK limit the peer has). The effects of this will be minimal but it is still advisable to attempt classification of TCP traffic on something consistent within a TCP stream, such as the client or peer port number, as this will then eliminate the potential for out of order TCP packets to exist and dupACKs being sent.
u32 Packet Classification Improvement
The previous section talked about classifying packets based on a consistent property, such as the client or peer port number. An even better method would be to use the u32 IPTABLES module which allows the actual content of packets to be analysed, from a range of bytes at a particular location within the packet down to individual bits, matching a customisable bit mask. Unfortunately, this module is lacking in most standard Linux distributions and normally requires recompilation of the Kernel in order to use it. The u32 IPTABLES module would effectively allow for a similar level of shaping control that ISPs already utilise when deploying commercial grade DPI (Deep Packet Inspection) traffic shaping equipment into their core networks.
The BitTorrent µTP Protocol
I actually came up with the traffic shaping methods in this HOWTO some years ago, well before µTP, the Micro Transport Protocol for BitTorrent, was developed. The insentive for µTP's development has been to combat the very issues discussed in this HOWTO by making the protocol congestion aware so it will automatically throttle back when detecting high packet latency. However, I managed to address these exact same problems by deploying the traffic shaping policies discussed in this HOWTO onto my own Linux router, at a time when BitTorrent traffic was still utilising the only reliable transport protocol available to it, TCP.
The µTP protocol uses the UDP protocol as its underlying transport protocol. It is clear that many BitTorrent clients now use µTP instead of TCP and, certainly on the network I have just now (which plays host to several heavy BitTorrent users), µTP traffic is now quite substantial. In this case, you may want to consider commenting out the ip(6)tables UDP length rule in the above script's for loop which will force unclassified UDP (all µTP) traffic into the lowest priority class, which is where all BitTorrent traffic should go. Doing this will also reduce the number of out of order µTP packets being sent between you and your BitTorrent peers (discussed above).
Conclusion
This is an amazingly simple and elegant traffic performance fix for asymmetric broadband connections. If you apply this script into a broadband Linux traffic shaping router, you will see increased speeds, not just in how fast things load up, but also the freedom obtained from accomplishing interactive tasks quickly, such as surfing the web, even with your upstream being completely saturated with outbound data (BitTorrent uploads). I now no longer see outbound saturated broadband connections as a bad thing! :-)
Acknowledgements
I would like to thank Shane Chen for QDISC examples located on his traffic shaping page. The ADSL Bandwidth Management HOWTO has also been of assistance.
In The Wild
I would like to mention that negge on the MikroTik forum has successfully translated the principles outlined in this HOWTO onto his MikroTik router, with astounding results. In his forum post, negge writes:
"With the current settings, if I'm seeding at full speed and somebody starts downloading something over FTP, the FTP transfer gets all upload bandwidth while the torrents almost stop. If I'm connected with SSH, there's absolutely no lag when I'm writing in the console. When surfing the web, DNS lookups happen instantly and pages load just like if I wasn't seeding at all."